> ## Documentation Index
> Fetch the complete documentation index at: https://statsig-4b2ff144-serverless-cloudflare.mintlify.site/llms.txt
> Use this file to discover all available pages before exploring further.

# React Native On-Device Evaluation

> Statsig's React Native SDK for on-device evaluation with React Native applications.

export const StatsigUserNotes = ({sdkName}) => <>
    {sdkName && <Note>
        For the {sdkName} On-Device Evaluation SDK, you pass the `StatsigUser` object {sdkName === "JavaScript" ? "into" : "directly into"} each evaluation method (`checkGate`, `getConfig`, etc.) rather than during initialization.
      </Note>}
    
    <Note>
      Unlike precomputed evaluation SDKs, the on-device evaluation SDK does not have an `updateUser` method since it evaluates gates/configs/experiments in real-time for any user object you pass in.
    </Note>
  </>;

<Callout icon="lightbulb">
  **Tip:** Get started quickly with one of our [sample apps](https://github.com/statsig-io/js-client-monorepo/tree/main/samples)!
</Callout>

<Callout icon="github">
  Source code: <a href="https://github.com/statsig-io/js-client-monorepo" target="_blank" rel="noreferrer">statsig-io/js-client-monorepo</a>
</Callout>

<Info>
  Statsig's normal (remote evaluation) SDKs are recommended for most client applications. Understand the use case and privacy risks by reading the [On-Device Eval SDK overview](/client/onDevice). On-device evaluation SDKs are for Enterprise & Pro Tier only.
</Info>

These SDKs use a different paradigm than their precomputed counterparts: [JS](/client/javascript-sdk), [Android](/client/Android), [iOS](/client/iosClientSDK), they behave more like Server SDKs. Rather than requiring a user up front, you can check gates/configs/experiments for any set of user properties, because the SDK downloads a complete representation of your project and evaluates checks in real time.

### Pros

* No need for a network request when changing user properties - just check the gate/config/experiment locally
* Can bring your own CDN or synchronously initialize with a preloaded project definition
* Lower latency to download configs cached at the edge, rather than evaluated for a given user (which cannot be cached as much)

### Cons

* Entire project definition is available client side - the names and configurations of all experiments and feature flags accessible by your client key are exposed. See our [client key with server permission best practices](/sdk-keys/api-keys/#client-keys-with-server-permissions)
* Payload size is strictly larger than what is required for the traditional SDKs
* Evaluation performance is slightly slower - rather than looking up the value, the SDK must actually evaluate targeting conditions and an allocation decision
* Does not support ID list segments with > 1000 IDs
* Does not support IP or User Agent based checks (Browser Version/Name, OS Version/Name, IP, Country)

<Note>
  Since `@statsig/react-native-bindings-on-device-eval` works in conjunction with `@statsig/js-on-device-eval-client`, documentation on the [JavaScript On-Device Evaluation SDK](/client/jsOnDeviceEvaluationSDK) is also relevant for React Native implementations.
</Note>

## Set Up the SDK

<Steps>
  <Step title="Install the SDK">
    ## Installation

    <Note>
      Since the `@statsig/react-native-bindings-on-device-eval` works in conjunction with `@statsig/js-on-device-eval-client`, documentation on those packages is also relevant for React Native implementations.
    </Note>

    Statsig uses a multi-package strategy, so you will need to install both the Statsig client and the React Native specific bindings.

    <CodeGroup>
      ```shell npm theme={null}
      npm install @statsig/react-native-bindings-on-device-eval
      ```

      ```shell yarn theme={null}
      yarn add @statsig/react-native-bindings-on-device-eval
      ```
    </CodeGroup>

    ### Peer Dependencies

    The `@statsig/react-native-bindings-on-device-eval` package has peer dependencies which may also need to be installed if they are not already in your project.

    <CodeGroup>
      ```shell npm theme={null}
      npm install @react-native-async-storage/async-storage
      ```

      ```shell yarn theme={null}
      yarn add @react-native-async-storage/async-storage
      ```
    </CodeGroup>
  </Step>

  <Step title="Initialize the SDK">
    Next, initialize the SDK with a client SDK key from the ["API Keys" tab on the Statsig console](https://console.statsig.com/api_keys). These keys are safe to embed in a client application.

    Along with the key, pass in a [User Object](#statsig-user) with the attributes you'd like to target later on in a gate or experiment.

    <Warning>
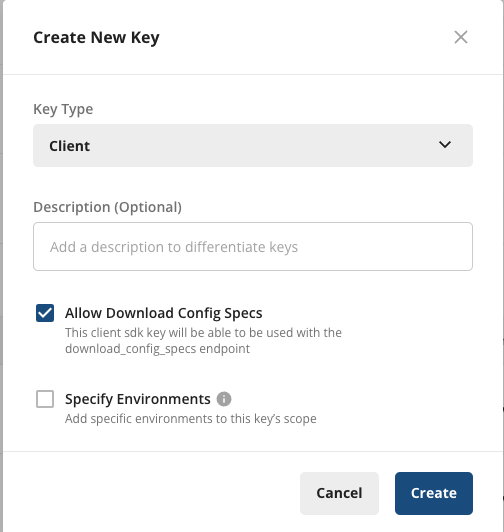
      For On-Device Evaluation, you'll need to add the **"Allow Download Config Specs"** scope. Client keys, by default, are not able to download the project definition for on-device evaluation.

      While client keys are safe to include, Server and Console keys should always be kept private.
    </Warning>

    <Accordion title="How to add the scope">
      <Tabs>
        <Tab title="New SDK Keys">
          When creating a new client key, select **"Allow Download Config Specs"**

          <img src="https://mintcdn.com/statsig-4b2ff144-serverless-cloudflare/4Y9GDUOpHMGP4hLA/images/local-eval/new-keys.png?fit=max&auto=format&n=4Y9GDUOpHMGP4hLA&q=85&s=6e20b109680d8c47c45acd37fce62b49" alt="Add DCS Scope to New Key" width="504" height="532" data-path="images/local-eval/new-keys.png" />
        </Tab>

        <Tab title="Existing SDK Keys">
          To add the scope to an existing key, under **Project Settings** > **API Keys** > **Client API Keys**, select **Actions** > **Edit Scopes**, and select **"Allow Download Config Specs"**, then **Save**.

          <img src="https://mintcdn.com/statsig-4b2ff144-serverless-cloudflare/4Y9GDUOpHMGP4hLA/images/local-eval/existing-keys.png?fit=max&auto=format&n=4Y9GDUOpHMGP4hLA&q=85&s=e6a1bef23ff390dcd7077104ed6a39ca" alt="Add DCS Scope to Existing Key" width="501" height="264" data-path="images/local-eval/existing-keys.png" />
        </Tab>
      </Tabs>
    </Accordion>

    ## React Native Specific Setup

    To get setup with Statsig in a React Native component tree, you should use the RN specific `StatsigProviderOnDeviceEvalRN`. This automatically switches out the storage layer used by the SDK, utilizing [AsyncStorage](https://github.com/react-native-async-storage) instead of LocalStorage (which isn't available in RN environments).

    ```tsx theme={null}
    import {
      StatsigProviderOnDeviceEvalRN,
      useFeatureGate,
    } from '@statsig/react-native-bindings-on-device-eval';

    function Content() {
      const gate = useFeatureGate('a_gate');

      return <div>Reason: {gate.details.reason}</div>; // Reason: Network or NetworkNotModified
    }

    function App() {
      return (
        <StatsigProviderOnDeviceEvalRN
          sdkKey={YOUR_CLIENT_KEY}
          loadingComponent={<Text>...</Text>}
        >
          <Content />
        </StatsigProviderOnDeviceEvalRN>
      );
    }
    ```
  </Step>
</Steps>

## Working with the SDK

## Setup a StatsigUser

To interact with the SDK, you will need to create a `StatsigUser` object. The full definition of this
object can be found [here](#statsig-user).

```typescript theme={null}
const myUser = {
    userID: "a-user",
    email: "user@statsig.com"
};
```

## React Hooks

### useGateValue or useFeatureGate

```typescript theme={null}
import { useGateValue } from '@statsig/react-native-bindings-on-device-eval';

const gateValue = useGateValue('a_gate', { userID: "a-user" }); // <-- Returns the boolean value
if (gateValue) {
  // 
}
```

```typescript theme={null}
import { useFeatureGate } from '@statsig/react-native-bindings-on-device-eval';

const gate = useFeatureGate('a_gate', { userID: "a-user" }); // <-- Returns the FeatureGate object
if (gate.value) {
  // 
}
```

### useDynamicConfig

```typescript theme={null}
import { useDynamicConfig } from '@statsig/react-native-bindings-on-device-eval';

function MyComponent() {
  const config = useDynamicConfig('a_config', { userID: 'a-user' }); // <-- Returns the DynamicConfig object
  const bgColor = config.value['bg_color'] as string;

  return <View style={{backgroundColor: bgColor}}></View>;
}
```

### useExperiment

```typescript theme={null}
import { useExperiment } from '@statsig/react-native-bindings-on-device-eval';

function MyComponent() {
  const experiment = useExperiment('an_experiment', { userID: 'a-user' }); // <-- Returns the Experiment object
  const bgColor = experiment.value['bg_color'] as string;

  return <View style={{backgroundColor: bgColor}}></View>;
}
```

### useLayer

```typescript theme={null}
import { useLayer } from '@statsig/react-native-bindings-on-device-eval';

function MyComponent() {
  const layer = useLayer('a_layer', { userID: 'a-user' }); // <-- Returns the Layer object
  const bgColor = layer.getValue('bg_color') as string;

  return <View style={{backgroundColor: bgColor}}></View>;
}
```

### Code Examples

Working sample apps are available in the repository:

* [React Native Examples](https://github.com/statsig-io/js-client-monorepo/tree/main/samples)

## Statsig User

You need to provide a StatsigUser object to check/get your configurations. You should pass as much
information as possible in order to take advantage of advanced gate and config conditions.

Most of the time, the `userID` field is needed in order to provide a consistent experience for a given
user (see [logged-out experiments](/guides/first-device-level-experiment) to understand how to correctly run experiments for logged-out
users).

Besides `userID`, we also have `email`, `ip`, `userAgent`, `country`, `locale` and `appVersion` as top-level fields on
StatsigUser. In addition, you can pass any key-value pairs in an object/dictionary to the `custom` field and be able to
create targeting based on them.

Once the user logs in or has an update/changed, make sure to call `updateUser`
with the updated `userID` and/or any other updated user attributes:

<StatsigUserNotes sdkName="React Native" />

## Client Event Emitter

It is possible to subscribe to StatsigClientEvents (Not to be confused with [StatsigEvent](#logging-an-event)). These events occur at various stages while using the Statsig client.
You can subscribe to specific events by specifying the StatsigClientEvent name, or, all events by using the wildcard token `'*'`.

```typescript theme={null}
import type {
  AnyStatsigClientEvent,
  StatsigClientEvent,
  StatsigClientEventCallback,
} from '@statsig/client-core';

const onAnyClientEvent = (event: AnyStatsigClientEvent) => {
  console.log("Any Client Event", event);
};

const onLogsFlushed = (event: StatsigClientEvent<'logs_flushed'>) => {
  console.log("Logs", event.events);
};

// subscribe to an individual StatsigClientEvent
myStatsigClient.on('logs_flushed', onLogsFlushed);

// or, subscribe to all StatsigClientEvents
myStatsigClient.on('*', onAnyClientEvent);

// then later, unsubscribe from the events
myStatsigClient.off('logs_flushed', onLogsFlushed);
myStatsigClient.off('*', onAnyClientEvent);
```

The full list of events and descriptions can be found [here](https://github.com/statsig-io/js-client-monorepo/blob/main/packages/client-core/src/StatsigClientEventEmitter.ts).

## Statsig Options

You can configure certain aspects of the SDKs behavior by passing a StatsigOptions object during initialization.

<ResponseField name="api" type="string">
  The API to use for all SDK network requests. You should not need to override this unless you have another API that implements the Statsig API endpoints.
</ResponseField>

<ResponseField name="logEventUrl" type="string">
  The URL used to flush queued events via a POST request. Takes precedence over `StatsigOptions.api`.
</ResponseField>

<ResponseField name="logEventBeaconUrl" type="string">
  The URL used to flush queued events via `window.navigator.sendBeacon` (web only). Takes precedence over `StatsigOptions.api`.
</ResponseField>

<ResponseField name="downloadConfigSpecsUrl" type="string" default="https://api.statsigcdn.com/v1/download_config_specs">
  The URL used to fetch your latest Statsig specifications. Takes precedence over `StatsigOptions.api`.
</ResponseField>

<ResponseField name="environment" type="StatsigEnvironment">
  An object you can use to set environment variables that apply to all of your users in the same session.
</ResponseField>

<ResponseField name="overrideStableID" type="string">
  Overrides the auto-generated stableID that is set for the device.
</ResponseField>

<ResponseField name="logLevel" type="LogLevel" default="LogLevel.Warn">
  How much information is allowed to be printed to the console.
</ResponseField>

<ResponseField name="dataAdapter" type="SpecsDataAdapter" default="StatsigSpecsDataAdapter">
  Implementing this type allows customization of the initialization. See [Using SpecsDataAdapter](/client/js-on-device-eval-client/using-evaluations-data-adapter) to learn more.
</ResponseField>

<ResponseField name="networkTimeoutMs" type="number" default="10,000">
  The maximum amount of time (in milliseconds) that any network request can take before timing out.
</ResponseField>

<ResponseField name="loggingBufferMaxSize" type="number" default="50">
  The maximum number of events to batch before flushing logs to Statsig.
</ResponseField>

<ResponseField name="loggingIntervalMs" type="number" default="10,000">
  How often (in milliseconds) to flush logs to Statsig.
</ResponseField>

<ResponseField name="overrideAdapter" type="OverrideAdapter">
  An implementor of `OverrideAdapter`, used to alter evaluations before its returned to the caller of a check api (checkGate/getExperiment etc).
</ResponseField>

## Manual Exposures

<Warning>Manual logging is error-prone and can often introduce issues like uneven exposures, which compromise experiment results.</Warning>

You can query your gates/experiments without triggering an exposure, and manually log the exposures later:

### Gates

```typescript theme={null}
// Check gate with exposure disabled
const result = myStatsigClient.checkGate('a_gate_name', { user, disableExposureLog: true });

// Manually log the exposure
myStatsigClient.checkGate('a_gate_name', { user });
```

### Configs

```typescript theme={null}
// Get config with exposure disabled
const config = myStatsigClient.getConfig('a_dynamic_config_name', { user, disableExposureLog: true });

// Manually log the exposure
myStatsigClient.getConfig('a_dynamic_config_name', { user });
```

### Experiments

```typescript theme={null}
// Get experiment with exposure disabled
const experiment = myStatsigClient.getExperiment('an_experiment_name', { user, disableExposureLog: true });

// Manually log the exposure
myStatsigClient.getExperiment('an_experiment_name', { user });
```

### Layers

```typescript theme={null}
// Get layer with exposure disabled
const layer = myStatsigClient.getLayer('a_layer_name', { user, disableExposureLog: true });
const paramValue = layer.get('a_param_name', 'fallback_value');

// Manually log the exposure
const layer = myStatsigClient.getLayer('a_layer_name', { user });
const paramValue = layer.get('a_param_name', 'fallback_value');
```

## Lifecycle & Advanced Usage

## Shutting Statsig Down

In order to save users' data and battery usage, as well as prevent logged events from being dropped, we keep event logs in client cache and flush periodically.
Because of this, some events may not have been sent when your app shuts down.

To make sure all logged events are properly flushed or saved locally, you should tell Statsig to shutdown when your app is closing:

```typescript theme={null}
await myStatsigClient.shutdown();
```

## Data Adapter

The `EvaluationsDataAdapter` type outlines how the `StatsigClient` should fetch and cache data during initialize and update operations.
By default, the `StatsigClient` uses `StatsigEvaluationsDataAdapter`, a Statsig provided implementor of the `EvaluationsDataAdapter` type. `StatsigEvaluationsDataAdapter`
provides ways to fetch data synchronously from Local Storage and asynchronously from Statsig's servers.
See [Using EvaluationsDataAdapter](/client/javascript/using-evaluations-data-adapter) to learn more and see example usage.

## Additional Resources

* [On-Device Evaluation SDK Overview](/client/onDevice)
* [JavaScript On-Device Evaluation SDK](/client/jsOnDeviceEvaluationSDK)
* [Client Keys with Server Permissions](/sdk-keys/api-keys/#client-keys-with-server-permissions)
* [Using EvaluationsDataAdapter](/client/javascript/using-evaluations-data-adapter)
* [Debugging SDK Evaluations](/sdk/debugging)
