> ## Documentation Index
> Fetch the complete documentation index at: https://statsig-4b2ff144-serverless-cloudflare.mintlify.site/llms.txt
> Use this file to discover all available pages before exploring further.
# Experiment on custom Unit ID types
In certain cases, you may want to randomize experiment bucketing using a custom Unit ID instead of the default `userID` or Statsig-generated Stable ID. For instance, if you're running a task management tool for companies and want to experiment on company-wide behaviors, you might use `companyID` as the Unit ID. This ensures all users from the same company get the same experience, allowing you to measure overall productivity impacts at a company level.
Custom ID types allow for this flexibility in your experiments and feature gates, enabling you to randomize and control rollouts based on any identifier you need.
### When to use custom Unit IDs:
* **Organization-wide experiments**: Group users by `companyID` for company-wide consistency.
* **Session-based experiments**: Use a session or device ID to control the experiment within a specific session.
* **Group-level rollouts**: Target teams, regions, or other specific cohorts using a relevant ID type.
Follow these three simple steps to set up an experiment with a custom Unit ID. In the following examples, we will use `companyID`, but you can replace it with any ID relevant to your use case.
> **Note**: These steps also apply to feature gates, allowing you to partially roll out features based on custom Unit IDs.
***
### Step 1: Add `companyID` as a Custom Unit ID
1. **Log into the Statsig Console**: Head over to [Statsig Console](https://console.statsig.com/) and navigate to **Project Settings**.
2. **Find Custom Unit IDs**: Under **Manage Account** > **Info**, look for the **Custom Unit IDs** section.
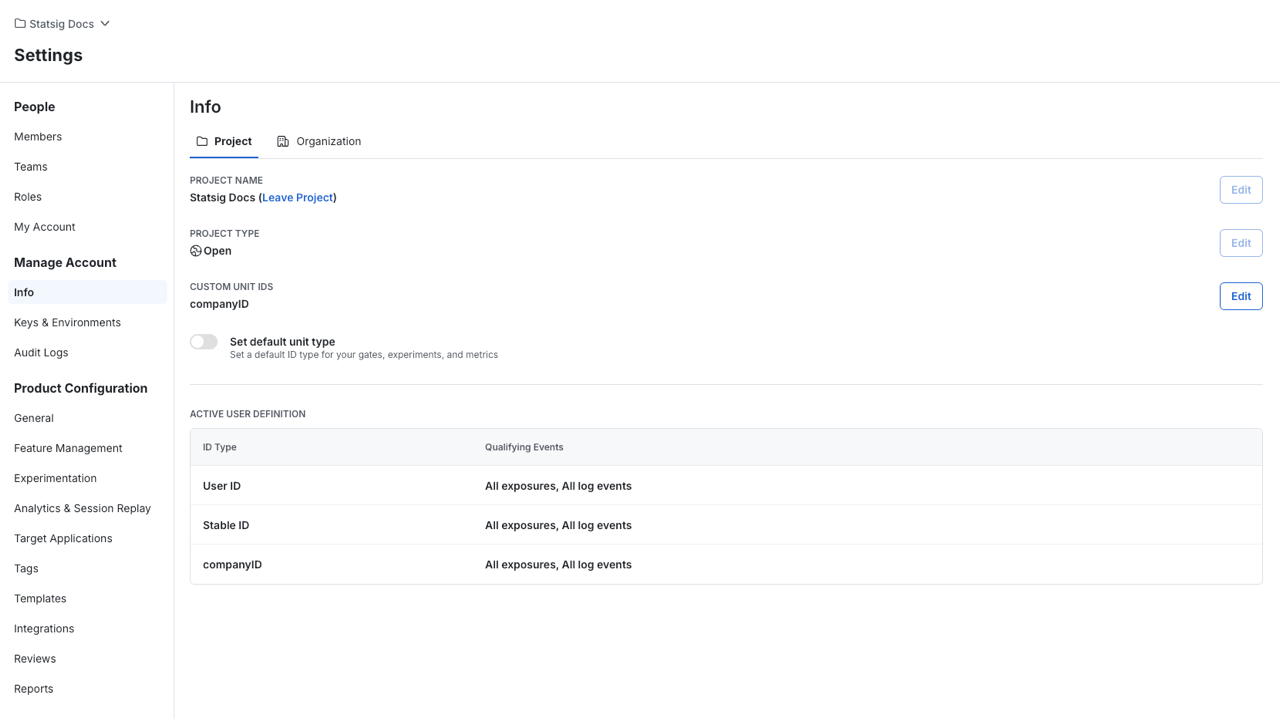 3. **Add a New Custom Unit ID**:
* Click the **Edit** button.
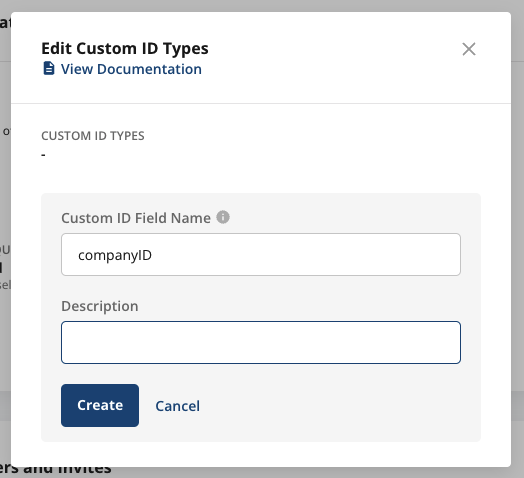
* Enter `companyID` as the new ID type and provide a description.
* Save the changes.
3. **Add a New Custom Unit ID**:
* Click the **Edit** button.
* Enter `companyID` as the new ID type and provide a description.
* Save the changes.
 Once added, this custom Unit ID can be used across all your Statsig configurations: experiments, gates, layers, dynamic configs, and autotunes. You only need to configure it once for your project! This unified configuration streamlines your workflow, allowing you to consistently use your custom identifier across various Statsig tools and features. Whether you're setting up a new experiment, configuring a feature flag, or creating a dynamic config, you can rely on your custom Unit ID to accurately target and analyze your specific user base or entities.
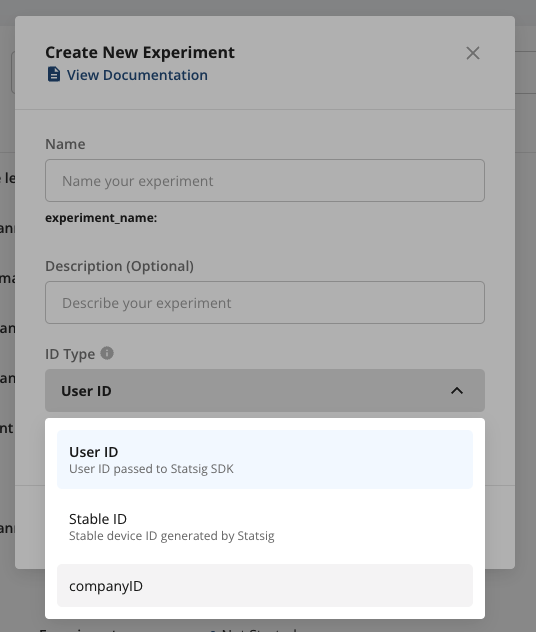
### Step 2: Select `companyID` as the ID Type in Your Experiment
1. **Create a New Experiment**:
* Navigate to **Experiments+** in the Statsig Console.
* When setting up a new experiment, find the **ID Type** dropdown and select `companyID`.
Once added, this custom Unit ID can be used across all your Statsig configurations: experiments, gates, layers, dynamic configs, and autotunes. You only need to configure it once for your project! This unified configuration streamlines your workflow, allowing you to consistently use your custom identifier across various Statsig tools and features. Whether you're setting up a new experiment, configuring a feature flag, or creating a dynamic config, you can rely on your custom Unit ID to accurately target and analyze your specific user base or entities.
### Step 2: Select `companyID` as the ID Type in Your Experiment
1. **Create a New Experiment**:
* Navigate to **Experiments+** in the Statsig Console.
* When setting up a new experiment, find the **ID Type** dropdown and select `companyID`.
 2. **Complete Experiment Setup**:
* Finish configuring your experiment as you would for any [user-level experiment](/guides/abn-tests).
* Define your hypothesis, metrics, and target audience.
Once done, click **Save** to finalize the setup.
> **Tip**: Choosing the right custom Unit ID ensures that all users with the same `companyID` are placed in the same experiment group, making it easier to measure performance at the group level (e.g., company-wide performance).
***
### Step 3: Provide `companyID` in the Statsig SDK
To use the custom Unit ID in your application, ensure it is provided when initializing the Statsig SDK. The `customIDs` field in the Statsig user object allows you to pass the `companyID` (or any other custom ID) along with the usual user information.
#### Example (JavaScript):
```javascript theme={null}
var user = {
userID: "some_user_id", // Standard user identifier
customIDs: {
companyID: "some_company_id" // Custom ID for grouping
},
// Other attributes (optional)
email: "user@example.com",
appVersion: "1.0.0"
};
// Initialize the Statsig Client
const client = new StatsigClient(sdkKey, user);
await client.initializeAsync();
```
* **`customIDs` field**: This allows you to pass a dictionary of custom IDs, including `companyID`, to ensure the experiment targets users based on that ID.
Once you've provided the necessary IDs in the SDK, you can start logging events and fetching experiment configurations based on the custom Unit ID.
***
2. **Complete Experiment Setup**:
* Finish configuring your experiment as you would for any [user-level experiment](/guides/abn-tests).
* Define your hypothesis, metrics, and target audience.
Once done, click **Save** to finalize the setup.
> **Tip**: Choosing the right custom Unit ID ensures that all users with the same `companyID` are placed in the same experiment group, making it easier to measure performance at the group level (e.g., company-wide performance).
***
### Step 3: Provide `companyID` in the Statsig SDK
To use the custom Unit ID in your application, ensure it is provided when initializing the Statsig SDK. The `customIDs` field in the Statsig user object allows you to pass the `companyID` (or any other custom ID) along with the usual user information.
#### Example (JavaScript):
```javascript theme={null}
var user = {
userID: "some_user_id", // Standard user identifier
customIDs: {
companyID: "some_company_id" // Custom ID for grouping
},
// Other attributes (optional)
email: "user@example.com",
appVersion: "1.0.0"
};
// Initialize the Statsig Client
const client = new StatsigClient(sdkKey, user);
await client.initializeAsync();
```
* **`customIDs` field**: This allows you to pass a dictionary of custom IDs, including `companyID`, to ensure the experiment targets users based on that ID.
Once you've provided the necessary IDs in the SDK, you can start logging events and fetching experiment configurations based on the custom Unit ID.
***